How to Install the HySecurity OEM Smart DC Controller Board
The HySecurity OEM Smart DC Controller Board is the heart of your gate operator, controlling critical functions and ensuring smooth operation. Replacing this board might seem like a daunting task, but with the right guidance, it’s straightforward and manageable. Whether you're troubleshooting issues or simply upgrading, this step-by-step guide will walk you through the process of replacing the board in your operator control box.
What You’ll Need to Install the HySecurity OEM Smart DC Controller Board
- Phillips-head screwdriver
- Needle nose pliers
- Tape for labeling connections
Before diving in, make sure to back up the current board’s settings. You can do this by using HySecurity's S.T.A.R.T. software or writing down settings from the control panel display. This ensures that the new board will function as intended with your existing configuration.
Step-by-Step Process to Install the HySecurity OEM Smart DC Controller Board
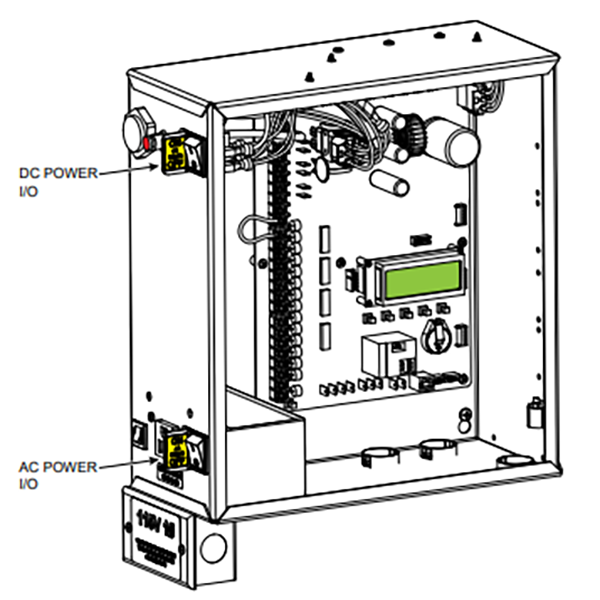
Step One: Power Off
First, turn off both the AC and DC power switches on the control box. Safety is critical, so double-check to ensure the power is completely off before proceeding.
Step Two: Disconnect Cables
Using tape, label the various accessory connections for easy reassembly later. Once labeled, disconnect all accessory cables from the board. If your setup includes HY-5A or HY-5B vehicle loop detectors, carefully crimp their standoffs with needle nose pliers and push the standoffs through their mounting holes.
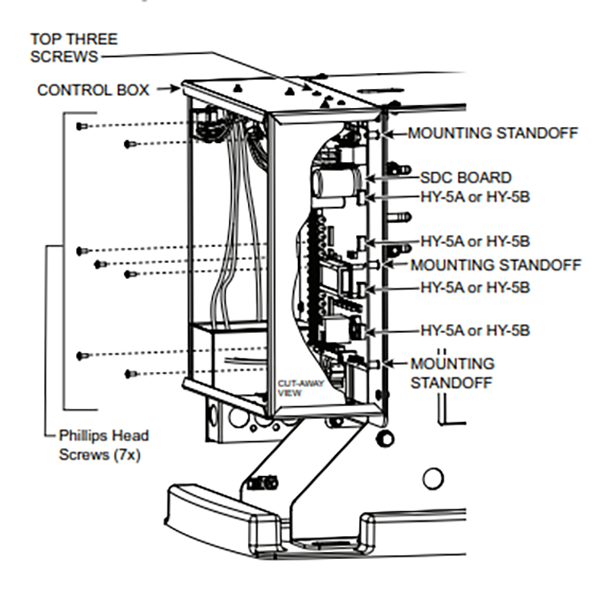
Step Three: Remove the Old Board
This Step is Only if you are REPLACING your Controller Board.Using a Phillips-head screwdriver, remove the seven screws securing the board and the three screws at the top of the control box. Set these screws aside safely, as you’ll need them for the new board.
Step Four: Install the New Board
Align the replacement board with the mounting standoffs, ensuring the orientation matches the previous board. Use the screws from the earlier step to secure it in place. Tighten the top three screws first, followed by the remaining ones. This ensures proper mounting.
Step Five: Reconnect and Power On
Reattach all the previously labeled cables, harness connectors, and HY-5A or HY-5B vehicle detectors. Once everything is connected, turn on the AC and DC power switches. Double-check that all jumpers and connections are in their correct locations.
Step Six: Configure the Operator Type
After powering up, the control display will prompt you to select the operator type. Follow these steps:
- Press SELECT when prompted. The display characters will start blinking.
- Use the NEXT and PREV buttons to navigate through the options and select the correct data.
- Lock in the selection by pressing SELECT again.
- Continue following the menu prompts to set parameters such as build year, gate usage class, and model number. Press NEXT to progress through each setup screen.
Once all the settings are configured, the operator will enter Run Mode, and the display will show the gate status.
FAQ | Questions About the HySecurity OEM Smart DC Controller Board
What Happens if I Select the Wrong Operator Type?
Choosing the incorrect operator type can cause the gate to malfunction, leading to improper operation or even damage to the equipment. It’s crucial to ensure the operator type matches your gate system specifications. If you make an error, use the S.T.A.R.T. software to reset the configuration, or contact HySecurity Technical Support at 800-321-9947 for guidance.
Do I Need to Back Up the Old Board Settings?
Yes, backing up the settings is essential. This allows you to restore custom configurations, such as speed, timer, and sensor settings, ensuring the new board performs exactly like the previous one. Without a backup, you may need to manually reprogram these parameters, which can be time-consuming.
Can I Install the New Board Myself?
Yes, but only if you’re comfortable with basic technical tasks and working with electrical components. The process requires careful attention to detail, especially when reconnecting cables and setting up operator parameters. If you feel unsure at any point, it’s always a good idea to consult a professional technician to avoid potential issues.
How Can I Tell if My Current Control Board Needs to be Replaced?
Signs that your Smart DC Controller Board might need replacement include intermittent gate operation, error messages on the control panel display, or complete system failure. If you’ve tried troubleshooting without success, replacing the board could resolve the issue. Consult the product manual or HySecurity support for confirmation.
What are the Risks of not Securing a Control Board Properly?
Failing to tighten the screws properly can result in the board shifting within the control box. This could lead to loose connections, short circuits, or operational instability over time. Always ensure the screws are firmly secured in the recommended sequence—top three screws first—to avoid potential damage or malfunction.
Contact Us
Whether you have any further questions on installing your HySecurity OEM Smart DC Controller Board or finding your next great Gate Opener Solution, Secure Openers has you covered. Our expert sales team is ready to help you with any questions you may have on Parts, Accessories, and any kind of opener you are looking for. Don't hesitate to Contact Us Today!
Contact Us